Showing posts with label Widgets and Plugins. Show all posts

Wednesday, 12 June 2019

How to Add Floating Sharing Bar in Blogger


This is one of the few social sharing widgets that took a lot of my time in designing it.

You have seen the trend of floating sharing count buttons on popular blogs. The traditional icons are now replaced with auto incremented counter buttons that are updated in seconds.

We created different versions of this bar applying both Jquery effects and CSS3 styles but this widget is different because it contains custom twitter, Pinterest and an Email button.

Services like Addthis and Sharethis are both doing a great job but they still need to work on some of their plugin integration conflicts.

Pinterest pin it buttons are causing great trouble and it badly fails in fetching the correct thumbnail image. In most cases it does not even select a image thus making the entire pinning concept tasteless.

We however redesigned the widget provided by shareThis to create a new one by correcting all flaws. This sharing bar would float to the left of your blog posts and would float as the visitor scrolls up or down.

This widget contains counters of important social networking sites that has the potential to bring you traffic by circulating your content to a wider audience.

We have tested the widget on major browsers like IE7+, Firefox, Chrome etc. and found it working just fine with no compatibility issues or design conflicts. Developers and bloggers are requested to link back to this post if in case they wish to share our code with their readers. Lets get to work now!

Which Social Networking Buttons To Use?

Your first priority should always be Facebook, Google+, Twitter, LinkedIn and Now Pinterest. All these sharing counters play well in circulating your content over a wide range of visitors.

Social Media is a non-stoppable engine, which if driven correctly and carefully can bring tons of valuable traffic each visitor worth a dollar. Since displaying too many count boxes could surely effect your blog load time therefore we have added a AddThis share button which provides visitors with over 330+ social sharing options all at one place. you can also add share button below posts to increase blog trafic See Here Add social media share button below each post in blogger

Why not use JQuery?

Ignore JavaScript and its library which is Jquery as much as possible. Browsers like Internet Explorer still lacks support to all functionalists offered by j query. Moreover JavaScript is responsible for a great percentage of your overall blog load time. 

How it works?

We have integrated both Addthis and ShareThis service in it. In order to customize the twitter button and others we took the Sharethis default code and customize it to change the button image, bubble size and count text. The widget that we initially developed looks extremely attractive compared to this one. You can see the first designed draft version in the screenshot below:

You can observe that both Twitter, Google Plus, Pinterest and Stumbleupon are displayed with custom shapes, same sizes and different count colors. I spent a lot of time trying to make all buttons of the same size by using a common image linked by a sprite but the only problem with this plugin is that the counts wont show the official numbers registered at Twitter, Google and pinterest servers but they will show increments registered at ShareThis. If you add this sharing bar to your blog, you will see zero on all counters unless someone clicks them and circulates your content.


To correct this issue I had to unfortunately dropped the idea of sharing the above designed version and share this tutorial widget instead. However the widget on our blog still contains the twitter button which wont display official count but that of ShareThis. If you would like to replace it with the official big size twitter count box then you can surely do this by customizing the code shared below.

Adding Floating Bar To Blogger

The steps are kept extremely easy to apply. All you need is to copy and paste the long chunk of code we developed and tested all day. Follow these friendly steps:
  1. Go to Blogger > Template
  2. Backup your template
  3. Click Edit HTML
  4. Click Proceed
  5. Then Click Expand Widget Templates
  6. Search for 
<b:includable id='post' var='post'> 
    7.Just below it paste the following code

<b:if cond='data:blog.pageType == &quot;item&quot;'>
<b:if cond='data:blog.pageType != &quot;static_page&quot;'>
<style>
.mbt_social_floating{
position:fixed; bottom:10%; margin-left:-60px; float:left; width:60px;
background-color:#f7f7f7; padding: 5px 0 0px 0px;
border-top:1px solid #ddd;
border-left:1px solid #ddd;
border-bottom:1px solid #ddd;
z-index:9999px !important;
border-radius:5px;-moz-border-radius:5px;-webkit-border-radius:5px;
}
.mbt_social_floating .mbt_side_social_button{
margin-bottom:5px;
float:none;
height:auto;
width:60px;
}
.mbt_social_floating .st_twitter_vcount, .mbt_social_floating.st_plusone_vcount, .st_email{
margin-left:5px;
}
.mbt_social_floating .st_fblike_vcount{
margin-left:5px;
}
.mbt_social_floating .stButton_gradient{
background:none !important;
height:21px !important;
padding-left:0 !important;
}
.mbt_social_floating .chicklets, .mbt_social_floating .stMainServices { background:url(&#39;http://1.bp.blogspot.com/-r3RYZkB4Pis/T7alrxNFYyI/AAAAAAAAGc4/ TCBwHNxEwR4/s400/gc_social_sprite.gif&#39;) no-repeat !important; height:19px !important;
width:45px !important;
padding:0 !important;
}
.st_email .chicklets{
background-position:0 -77px !important;
background-image:url(&#39;http://1.bp.blogspot.com/-r3RYZkB4Pis/T7alrxNFYyI/AAAAAAAAGc4/ TCBwHNxEwR4/s400/gc_social_sprite.gif&#39;) !important;
}
.mbt_social_floating .st_twitter_vcount .st-twitter-counter{ background-position:0 -58px !important;
}
.mbt_social_floating .stButton_gradient{
border:none !important;
}
.mbt_social_floating .stBubble_count{
width:44px !important;
font-size: 15px !important;
font-weight: normal !important;
padding-top:7px !important;
height:23px !important;
background:none !important;
}
.mbt_social_floating .st_twitter_vcount .stBubble_count{ color:#00a6df;
background-color:#f8fbfc !important;
}
.st_fblike_vcount{
margin-bottom: 0px;
display: block;
}
.st_twitter_vcount{
margin-bottom: 3px;
display: block;
}
.st_email{
margin-bottom: 5px; margin-top: 3px;
display: block;
}
.mbt_social_floating .stBubble{
background-position: 21px 31px !important;
height:35px !important;
}.mbt_social_floating .st_pinterest_vcount{ margin-left:5px;}.mbt_social_floating .st_pinterest_vcount .st-pinterest-counter{ background-position:0 -19px !important;}.mbt_social_floating .st_pinterest_vcount .stBubble_count{ color:#FF0505; background-color:#fbf8f8 !important;
}.mbt_social_floating .st_pinterest_vcount .stBubble{ background-image:url('http://1.bp.blogspot.com/-meqDjtBStCA/ULFkqTG88qI/AAAAAAAAIGs/hjCRAqGL270 /s400/bubble_arrow_pinterest.png') !important;}.st_pinterest_vcount{ margin-bottom: 0px; display: block;}</style>
<div class='mbt_social_floating'>
<script type='text/javascript'>var switchTo5x=true;</script>
<script src='http://w.sharethis.com/button/buttons.js' type='text/javascript'/>
<script type='text/javascript'>stLight.options({onhover:false, , doNotHash: true, doNotCopy: true, hashAddressBar: false});</script>
<!-- No more works properly so removing it from mbt list --!>
<span class='st_fblike_vcount' displaytext=''/>-->
<div style='margin:0px 0 0px 10px;'><div id='fb-root'/><script src='http://connect.facebook.net/en_US/all.js#xfbml=1'/><fb:like font='' href='' layout='box_count' send='false' show_faces='false'/></div>
<span class='st_twitter_vcount' displaytext='' st_via='learnblogger'/> <span class='st_pinterest_vcount' displaytext=''/><div style='margin:0px 0 0 5px;'>
<span class='st_plusone_vcount' displaytext=''/>
</div>
<div class='addthis_toolbox addthis_default_style ' style='margin:5px 0px 5px 8px;'>
<a class='addthis_counter'/>
</div>
<script src='http://s7.addthis.com/js/250/addthis_widget.js' type='text/javascript'/>
<script type='text/javascript'>
var addthis_config = {
ui_cobrand: &quot;MY BLOGGER TRICKS&quot;,
ui_header_color: &quot;#ffffff&quot;,
ui_header_background: &quot;#0080FF&quot;
}
</script>
<span class='st_email' displaytext=''/>
<p style=' line-height:0px; font-size:10px; font-weight:bold; text-align:center;'><a href='http://mybloggertutorials.blogspot.com/2014/05/how-to-add-floating-sharing-bar-in.html' style='color:#CAC8C8;'>Widgets</a></p>
</div>
</b:if></b:if>

Just replace learnblogger with your twitter username. 

  2.  Save your template and you are all done! 

Optional step:

<div id="fb-root"></div>
<script>(function(d, s, id) {
var js, fjs = d.getElementsByTagName(s)[0];
if (d.getElementById(id)) return;
js = d.createElement(s); js.id = id;
js.src = "//connect.facebook.net/en_US/all.js#xfbml=1"; fjs.parentNode.insertBefore(js, fjs);
}(document, 'script', 'facebook-jssdk'));</script>

Need Help :

This floating bar would display on post pages only and wont display on homepage. 

The widget has a white background and floats to the left of blog posts. 

If you want it to float to right then all you need is to edit the part of the code bolded in black. 

You can surely ask for my help which would be no less than a pleasure. Please post any query you may have in the comment box below. Till then take good care of yourselves and your loved ones. Peace and blessings pals! :)

KEEP READING

How to add a subscription form in blogger

I have already shared many tutorials on RSS Subscription forms such as Subscription Email Form and Subscription Feed Widget and today we have yet another but extremely beautiful and easy to edit subscription form dozed with new CSS effects. This widget will keep your sidebar neat and clean and will surely attract visitors to subscribe.

How To Add this Subscription Form To Blogger

  1. Go To Blogger > Design > Page Elements 
  2. Choose HTML JavaScript Widget 
  3. Paste the following code in it, 
<style>
.mbt-email{
background:url(https://blogger.googleusercontent.com/img/b/R29vZ2xl/AVvXsEhS6NaB4T_wkfR973TIxaFPfP2We6aOQrdyWhi0jnJRMqag_w4gw-_VXv7GtEeyEk-7Q4UZ3b8uBOh0rxDqU0ZctoQBpFzZom8QmyWusCyZD1BLLf5V7PAWerz7n8srrg0OtKhmAedpGKNC/s1600/email.png) no-repeat 0px 12px ;
width:300px;
padding:10px 0 0 55px;
float:left;
font-size:1.4em;
font-weight:bold;
margin:0 0 10px 0;
color:#686B6C;
}
.mbt-emailsubmit{
background:#9B9895;
cursor:pointer;
color:#fff;
border:none;
padding:3px;
text-shadow:0 -1px 1px rgba(0,0,0,0.25);
-moz-border-radius:6px;
-webkit-border-radius:6px;
border-radius:6px;
font:12px sans-serif;
}
.mbt-emailsubmit:hover{
background:#E98313;
}
.textarea{
padding:2px;
margin:6px 2px 6px 2px;
background:#f9f9f9;
border:1px solid #ccc;
resize:none;
box-shadow:inset 1px 1px 1px rgba(0,0,0,0.1);
-moz-box-shadow:inset 1px 1px 1px rgba(0,0,0,0.1);
-webkit-box-shadow:inset 1px 1px 1px rgba(0,0,0,0.1); font-size:13px;
width:170px;
color:#666;}
</style>
<div class="mbt-email">
Subscribe via Email <form action="http://feedburner.google.com/fb/a/mailverify" id="feedform" method="post" target="popupwindow" onsubmit="window.open('http://feedburner.google.com/Mybloggertutorials', 'popupwindow', 'scrollbars=yes,width=550,height=520');return true">
<input gtbfieldid="3" class="textarea" name="email" onblur="if (this.value == &quot;&quot;) {this.value = &quot;Enter email address here&quot;;}" onfocus="if (this.value == &quot;Enter email address here&quot;) {this.value = &quot;&quot;;}" value="Enter email address here" type="text" />
<input type="hidden" value="Mybloggertutorialsmbt" name="uri"/><input type="hidden" name="loc" value="en_US"/>
<input class="mbt-emailsubmit" value="Submit" type="submit" />
</form>
</div>

Now make these changes,

Now replace http://feedburner.google.com/mybloggertutorials with your Feedburner Email Feed link. You can get it by visiting your feedburner account then navigate to Publicize and then to Email Subscriptions.
Replace Mybloggertutorialsmbt with your feed title. It appear at the end of your feed link. In my case it is http://feedburner.google.com/fb/a/mailverify?uri=Mybloggertutorialsmbt

Don't miss: Floating Social Media Share Bar For Blogger
Save your widget and view your blog to see it showcasing live! :)

Need Help?

Do let me know if you needed any help in customizing the widget in the comments section below, i would be gald to help you out.

KEEP READING

Tuesday, 24 July 2018

Floating Social Media Share Bar For Blogger

Floating social meda share bar for blogger
As you already know that social sharing is the most important thing for our blogs. Social Sharing help us into drive more traffic from Social Network Websites, allowing readers for share your post and get much more traffic from Social Network Websites.
Social share buttons play vital role in your blog's traffic.

Many bloggers have already posted floating social share buttons widget but it is different updated version which looks alike sumome floating bar.


Without wasting any more time let's get to work.

DEMO: see on left side of my blog.

Adding Floating social share bar

  • Go to Blogger > Template > Edit Html
  • Press ctrl+f  inside Editor  and Find <head>
  • paste the following code under <head> 
<link href='http://netdna.bootstrapcdn.com/font-awesome/4.2.0/css/font-awesome.css' rel='stylesheet'/>

  • Once again add (Javascript) following code just after <head>  
<script src='http://ajax.googleapis.com/ajax/libs/jquery/1.7.1/jquery.min.js' type='text/javascript'/>
Note:  If you have already added javascript above code then don't add it.


  • Now search for  </head> and just before it paste the following code.
/*---- social share bar by Mybloggertutorials.blogspot.com -----*/<b:if cond='data:blog.pageType == &quot;item&quot;'>
<style type='text/css'>
.mbt_SocialBar {
  position: fixed;
  bottom: 30%;
  padding: 0;
  left:0;
  background: none;
  text-align: center;
  margin: 0 auto;
  z-index: 99999999;
}
.mbt_SocialBar label:hover {
  cursor: pointer;
  opacity:1;
}
.mbt_SocialBar label {
  text-align: center;
  opacity: 0.4;
  width: 50px;
  background: #3A3939;
  color: #FFF;
  border: 0;
  font-family: FontAwesome;
  display: block;
  font-size: 12px;
  padding: 0px 0px;
  border-radius: 0;
  -webkit-transition: all .4s ease-in-out;
  -moz-transition: all .4s ease-in-out;
  -ms-transition: all .4s ease-in-out;
  -o-transition: all .4s ease-in-out;
  transition: all .4s ease-in-out;
  position: absolute;
  line-height: 1.5em;
  margin-top: 346px;
}
input.ShowHide_Button:checked + label {
  transform-origin: 50% 0%!important;
  -webkit-transform-origin: 50% 0%!important;
  -moz-transform-origin: 50% 0%!important;
  -ms-transform-origin: 50% 0%!important;
  -o-transform-origin: 50% 0%!important;
  opacity: 1;
  -webkit-transform: translateX(0px) rotateY(-180deg);
  -moz-transform: translateX(0px) rotateY(-180deg);
  -ms-transform: translateX(0px) rotateY(-180deg);
  -o-transform: translateX(0px) rotateY(-180deg);
  transform: translateX(0px) rotateY(-180deg);
  -webkit-transition-delay: 0.2s;
  -moz-transition-delay: 0.2s;
  -ms-transition-delay: 0.2s;
  -o-transition-delay: 0.2s;
  transition-delay: 0.2s;
  border: 1px solid #3A3939;
  border-radius: 50px 0px 0px 50px;
  width: 30px;
  max-width: 30px;
}
input.ShowHide_Button ~ .ShowHideMe {
  -webkit-transition: .6s all cubic-bezier(0.730, -0.485, 0.145, 1.620);
  -moz-transition: .6s all cubic-bezier(0.730, -0.485, 0.145, 1.620);
  -ms-transition: .6s all cubic-bezier(0.730, -0.485, 0.145, 1.620);
  -o-transition: .6s all cubic-bezier(0.730, -0.485, 0.145, 1.620);
  transition: .6s all cubic-bezier(0.730, -0.485, 0.145, 1.620);
}
input.ShowHide_Button:checked ~ .ShowHideMe {
  margin-left: -75px !important;
}
input.ShowHide_Button {
  display: none;
}
.mbt_SocialBar .social_menu {
  display: inline-block;
  float: left;
  list-style:none;
  max-width:50px;
  margin: 0;
  padding: 0;
}
.mbt_SocialBar .social_menu .button_facebook {
  background: #3a579a;
}
.mbt_SocialBar .social_menu .button_facebook:hover {
  background: #314a83;
}
.mbt_SocialBar .social_menu .button_twitter {
  background: #00abf0;
}
.mbt_SocialBar .social_menu .button_twitter:hover {
  background: #0092cc;
}
.mbt_SocialBar .social_menu .button_googleplus {
  background: #df4a32;
}
.mbt_SocialBar .social_menu .button_googleplus:hover {
  background: #be3f2b;
}
.mbt_SocialBar .social_menu .button_pinterest {
  background: #cd1c1f;
}
.mbt_SocialBar .social_menu .button_pinterest:hover {
  background: #ae181a;
}
.mbt_SocialBar .social_menu .button_stumbleupon {
  background: #ea4b24;
}
.mbt_SocialBar .social_menu .button_stumbleupon:hover {
  background: #c7401f;
}
.mbt_SocialBar .social_menu .button_linkedin {
  background: #2554BF;
}
.mbt_SocialBar .social_menu .button_linkedin:hover {
  background: #224EB4;
}
.mbt_SocialBar .social_menu .button_facebook .count,
.mbt_SocialBar .social_menu .button_twitter .count,
.mbt_SocialBar .social_menu .button_googleplus .count,
.mbt_SocialBar .social_menu .button_pinterest .count,
.mbt_SocialBar .social_menu .button_stumbleupon .count,
.mbt_SocialBar .social_menu .button_linkedin .count {
  color: #fff!important;
  padding-top: 4px;
  font-size: 13px !important;
  line-height: 1.2em;
  font-family: sans-serif;
  font-weight: bold;
}
.mbt_SocialBar .social_menu &gt; ul {
  margin: 0;
  padding: 0;
  list-style: none;
}
.mbt_SocialBar .social_menu .share {
  background: #FFF;
  color: #807F7F;
  font-size: 11px;
  height: 45px !important;
}
.mbt_SocialBar .social_menu .share .count.h4 {
  font-size: 18px;
  font-family: sans-serif;
  color: #424242;
  height: 25px !important;
  line-height: 1.5em;
  font-weight: bold;
  margin: 0px !important;
}
.mbt_SocialBar .social_menu .share .h6 {
  padding-bottom: 3px;
  font-family: sans-serif;
  margin: 0px !important;
  line-height: 1.5em;
  font-size: 11px;
}
.mbt_SocialBar .social_menu &gt; ul &gt; li {
  margin: 0px 0px 0px 0px;
  position: relative;
  text-align: center;
  list-style: none;
  list-style-type: none;
  padding: 0px;
  border: 0px;
  border-left: 0 solid rgba( 0,0,0,.4);
  height: 50px;
  width: 50px;
  overflow: hidden;
  display: block;
  box-sizing: border-box;
  background: none;
  box-sizing: content-box;
  -webkit-transition: all 0.3s ease-in-out;
  -moz-transition: all 0.3s ease-in-out;
  -ms-transition: all 0.3s ease-in-out;
  -o-transition: all 0.3s ease-in-out;
  transition: all 0.3s ease-in-out;
}
.mbt_SocialBar .social_menu &gt; ul &gt; li a {
  display: block;
  width: 100%;
  height: 100%;
  box-sizing: border-box;
  padding: 5px 0px;
  cursor: pointer;
  text-decoration: none;
}
.mbt_SocialBar .social_menu &gt; ul &gt; li:hover {
  border-left: 5px solid rgba( 0,0,0,.3);
  width: 40px;
}
.mbt_SocialBar .social_menu &gt; ul &gt; li i {
  color: #fff !important;
  font-family: FontAwesome;
  font-size: 20px;
  font-style: normal;
  font-weight: normal;
  line-height: 1em;
  -webkit-transition: all 0.3s ease-in-out;
  -moz-transition: all 0.3s ease-in-out;
  -ms-transition: all 0.3s ease-in-out;
  -o-transition: all 0.3s ease-in-out;
  transition: all 0.3s ease-in-out;
}
.mbt_SocialBar .social_menu &gt; ul &gt; li:hover i {
  opacity: 0.9;
}
@media only screen and (min-width:768px) and (max-width:979px) {
.mbt_SocialBar {
  bottom: 20% !important;
}
}
@media only screen and (min-width:480px) and (max-width:767px) {
.mbt_SocialBar {
  bottom: 15% !important;
}
}
 @media only screen and (max-width:479px) {
.mbt_SocialBar {
  bottom: 10% !important;
  display: none !important; /*---delete this code line to make it appear on mobile--*/
}
}
</style>
</b:if>

  • Now Search for <div class='post-footer-line post-footer-line-3'> 


  • and just after if paste the following code
/*---- social share bar by Mybloggertutorials.blogspot.com -----*/
<b:if cond='data:blog.pageType == &quot;item&quot;'>
<b:if cond='data:blog.pageType != &quot;static_page&quot;'>
<div class='mbt_SocialBar'>
<input class='ShowHide_Button' id='twiSter' type='checkbox'/>
<label for='twiSter'><i class='fa fa-arrow-left'/></label>
<div class='ShowHideMe'>
<div class='social_menu'>
<div class='share'>
<div class='share-btn' data-service='total'>
<div class='count h4'/>
<div class='h6'>SHARES</div>
</div></div>
<ul>
<li class='button_facebook'>
<a expr:href='&quot; http://www.facebook.com/share.php?v=4&amp; src=bm&amp; u=&quot; + data:post.url + &quot; &amp; t=&quot; + data:post.title' onclick='window.open(this.href,&quot; sharer&quot; ,&quot; toolbar=0,status=0,width=626,height=436&quot; ); return false;' rel='nofollow'><strong><i class='fa fa-facebook'/>
<div class='share-btn' data-service='facebook'>
<div class='count'/></div></strong>
</a>
</li>
<li class='button_twitter'>
<a expr:href='&quot;https://twitter.com/intent/tweet?url=&quot; + data:blog.url + &quot;&amp;text=&quot; + data:post.title + &quot; via @Learnblogger- &quot;' onclick='window.open(this.href,&quot; sharer&quot; ,&quot; toolbar=0,status=0,width=626,height=436&quot; ); return false;' rel='nofollow'><strong><i class='fa fa-twitter'/>
<div class='share-btn' data-service='twitter'>
<div class='count'/></div></strong>
</a>
</li>
<li class='button_googleplus'>
<a expr:href='&quot; https://plus.google.com/share?url=&quot; + data:post.url' onclick='javascript:window.open(this.href,&quot; &quot; ,&quot; menubar=no,toolbar=no,resizbutton_le=yes,scrollbars=yes,height=600,width=600&quot; ); return false; ' rel='nofollow'><strong><i class='fa fa-google-plus'/>
<div class='share-btn' data-service='google'>
<div class='count'/></div></strong>
</a>
</li>
<li class='button_pinterest'>
<a data-pin-config='beside' expr:href='&quot; http://pinterest.com/pin/create/button/?url=&quot; + data:post.url + &quot; &amp;media=&quot; + data:blog.postImageUrl + &quot;&amp;description=&quot; + data:post.title' onclick='window.open(this.href,&quot; sharer&quot; ,&quot; toolbar=0,status=0,width=626,height=500&quot; ); return false;' rel='nofollow'><strong><i class='fa fa-pinterest'/>
<div class='share-btn' data-service='pinterest'>
<div class='count'/></div></strong>
</a>
</li>
<li class='button_stumbleupon'>
<a expr:href='&quot; http://www.stumbleupon.com/submit?url=&quot; + data:post.url + &quot; &amp; title=&quot; + data:post.title' onclick='window.open(this.href,&quot; sharer&quot; ,&quot; toolbar=0,status=0,width=626,height=500&quot; ); return false;' rel='nofollow'><strong><i class='fa fa-stumbleupon-circle'/>
<div class='share-btn' data-service='stumbleupon'>
<div class='count'/></div></strong>
</a>
</li>
<li class='button_linkedin'>
<a expr:href='&quot; http://www.linkedin.com/shareArticle?mini=true&amp; url=&quot; + data:post.url + &quot; &amp; title=&quot; + data:post.title + &quot; &amp; summary=&amp; source=&quot; ' onclick='window.open(this.href,&quot; sharer&quot; ,&quot; toolbar=0,status=0,width=626,height=500&quot; ); return false;' rel='nofollow'><strong><i class='fa fa-linkedin'/>
<div class='share-btn' data-service='linkedin'>
<div class='count'/></div></strong>
</a>
</li>
</ul>
</div>
</div>
</div>
<script type='text/javascript'>//<![CDATA[
$(document).ready(function () {
var shareUrl = $("link[rel=canonical]").attr("href");
$.getJSON('https://count.donreach.com/?url=' + encodeURIComponent(shareUrl) + "&callback=?", function (data) {
shares = data.shares;
$(".count").each(function (index, el) {
service = $(el).parents(".share-btn").attr("data-service");
count = shares[service];
if (count > 1000) {
count = (count / 1000).toFixed(1);
if (count > 1000) count = (count / 1000).toFixed(1) + "M";
else count = count + "k";
}
$(el).html(count);
});
});
});
//]]></script>
</b:if>
</b:if>

  • Remove Learnblogger  with your twitter username and you are done. don't forget to subscribe to our newsletter for more interesting widgets.

Also Check: How To Add Horizontal Social Sharing Buttons in Blogger


Note: let me know if it doesn't work on your blog or site in comments below, I would be gald to help you out.


KEEP READING

Friday, 20 July 2018

3 must have widgets for any blog


Blogger widgets are one of the most important part of your template. Selecting proper widgets for your blog that helps your visitors and also helps your blog to increase traffic should be done properly. Their are lots of blogger widgets out their but it doesn't mean that you should add every widgets you come across. You should add those widgets that's helps you and your readers and also which are relevant to your blog. For example previously i posted about HTML5 Music Player widget, Every blogger does not need to add this widget but those with blogs on songs, movies should definitely add this. In this post i will share with you few blogger widgets that every blogger must implement on their blog.

1. Facebook Like Box

Social Media is growing day by day and Facebook is at top of this list with around 1 Billion users. Lots of people spend most of their time on Facebook, so it can help you to generate greater traffic to your blog. So implementing a Facebook Like Box to your blog can help your visitors to like your Facebook page easily from within your blog to get latest update on their Facebook profile. In short Greater the Facebook fans you have greater is traffic generated from it.

2. Twitter Follow Button


After Facebook the big name in social network comes the twitter with 500
million users and more than 350 +million tweets generated per day. So implementing twitter follow button on your blog will allow your visitors to easily follow you on twitter to get latest updates of your blog. Try to increase your follower to get more traffic from twitter. If don't like to tweet daily or you don't use twitter so often then you can check below article to automatically tweet latest blog posts on your twitter account.

3. Popular Posts


Popular post is awesome widget for your blog. It shows most popular post or articles on your blog. You can change settings to show number of post and to show thumbnail or not and more. This widget is easy to install on your blog. It can be installed directly from your blog layout section. This will let your visitors know which are the most popular blog post on your blog.


KEEP READING

Monday, 16 June 2014

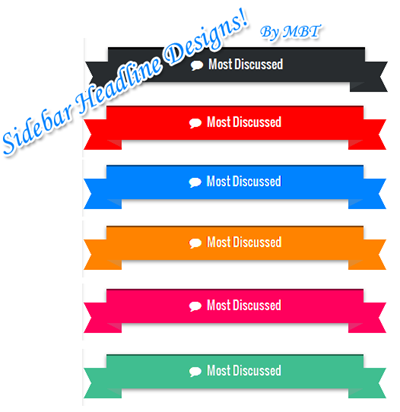
How To Add Fancy Ribon Backgrounds to Blogger Sidebar


Looking for a cool Design Change for your blog sidebar's Headlines instead of that dull plain text headlines? Today we will learn an interesting way of customizing the sidebar Headline Backgrounds in BlogSpot templates. You have seen Photoshop Graphic designs in Ribbon, Canopy or Curtain Style but the problem with them is that you need to have good designing skills to in order to create them further they also slow down the load time of your webpage. Therefore we are bringing forward the simplest solution by designing Ribbon style backgrounds with the help of pure CSS3 rules without using a single image! The method described below can be used to create ribbon backgrounds in any platform, may it be wordpress or Blogger. All you need to do is add up some CSS styles. We are sure this will add an extra ordinary look and feel to your online diaries! The Demo can be seen live on our blog sidebar. Its time to get into your blogger factory and be creative. Lets get started!

Create Ribbon backgrounds in Blogger 

To create a ribbon background for any Sidebar widget, first we need to know the ID value of that widget. For that do the following: 

Finding the Widget ID Value:

  1. Go To Blogger > Layout
  2. Click the edit button to open your widget
  3. In the address bar section of the widget window that pops up you will find a long http URL. Towards the end of the link you will find the widgetid value as shown below. Which is HTML3 in our case. 

4. Copy this widget value in exact same form.

5. Done! Move to next steps now.

Note: This widget

Designing the ribbon Background with CSS3

  1. Go To Blogger > Template
  2. Backup your template
  3. click Edit HTML to open the template editor
  4. Inside the editor hit Ctrl + F to open a search box.
  5. Search for ]]></b:skin>
  6. Just above it paste the following style code:
{
position: relative;
padding: 10px 0px 15px !important;
margin: 0px 0px 10px 27px !important;
color: #ffffff;
background-color: #282C2F;
box-shadow: 0px 2px 4px rgb(136, 136, 136);
border-top: 3px solid #000000;
background-image: none !important;
height: auto !important;
width: 338px;
}
#HTML13 h2:before
{
    content: ' ';
    position: absolute;
    width: 30px;
    height: 0;
    left: -30px;
    top: 16px;
    border-width: 20px 10px;
    border-style: solid;
    border-color: #282C2F #282C2F #282C2F transparent;  
}
#HTML13 h2:after
{
    content: ' ';
    position: absolute;
    width: 30px;
    height: 0;
    right: -30px;
    top: 16px;
    border-width: 20px 10px;
    border-style: solid;
    border-color: #282C2F transparent #282C2F #282C2F;
}

#HTML13 h2 span:before
{
    content: ' ';
    position: absolute;
    width: 0;
    height: 0;
    left: 0px;
    top: 100%;
    border-width: 5px 10px;
    border-style: solid;
    border-color: #353A3D #353A3D transparent transparent;
        z-index:99999;
}

#HTML13 h2 span:after
{
    content: ' ';
    position: absolute;
    width: 0;
    height: 0;
    right: 0px;
    top: 100%;
    border-width: 5px 10px;
    border-style: solid;
    border-color: #353A3D transparent transparent #353A3D;
        z-index:99999;
}
 Follow these customization tips to give your ribbon any color you want:
  • To change the background color of the ribbon edit the hexadecimal color codes highlighted as yellow i.e: #282C2F
  • To change the background color of the ribbon tails edit: #353A3D Tip: Give it a slightly lighter shade compared to the background. See an example of ribbon tails below. Background is Red but tails are lighter Red.
  • To change the text color edit #ffffff
  • To change the color of border top edit #000000; if you don't want to add a border then delete border-top: 3px solid #000000; 
  • To change the width of the ribbon background edit 338px   
7. Now Click "Jump to widget" button located at the top in template editor and select the widget value. In our case it was HTML3 so I will select this one: 

8. Expand the code by clicking the black arrow. You will need to expand it one more time.


9. In the expanded code you will find this code:
<h2 class='title'><data:title/></h2>
Replace it with this one:
<h2 class='title'><span><data:title/></span></h2>
Here we simply enclosed the sidebar Headline with a Span tag in order to apply the ribbon tail effect. The headline could have a Tag <h2> or <h3> or even <h1> . This tag may differ in custom templates. 

10. Save your template and you are all done!

Need Help?

We hope this tutorial helps you further decorate your blogs like never before and create beautiful widgets that may engage your readers even more. Let us know if you need any help. Peace and blessings buddies. :)

KEEP READING

Saturday, 14 June 2014

How To Add Horizontal Social Sharing Buttons in Blogger


As you already know that social sharing is the most important thing for our blogs. Social Sharing help us into drive more traffic from Social Network Websites, allowing readers for share your post and get much more traffic from Social Network Websites.

There are many sites of social networking but most using sites is Facebook,Google Plus and Twitter that's why in this widget there are only three Social Sharing buttons, mostly readers are using this three Social Network.

Many bloggers already posted this widget but that contains many error that's why i am sharing this widget, it will works without any error like a cham. So I added a new feature in this widget, Comments Counter which will tell you how much comments are on your post, this widget will only show on Post Page.

Mainly, these widget are built with HTML, CSS, Javascript and XML. In this Horizontal Social Sharing Widget we have customized it very well and buttons made by developers of their websites. This widget will not decrease the loading speed of your blog.

Adding Horizontal Social Sharing Buttons in Blogger

We will add Horizontal Social Sharing Button with Comments Counter below Post Title in Blogger. We have mentioned some steps below follow them exactly.
  • Go to Blogger > Template > Editor
  • Click inside Editor and Find </head>
  • Paste the following code above </head>
<b:if cond='data:blog.pageType == &quot;item&quot;'>
<script type='text/javascript'>
// Twitter
(function (a, b, c){var d=a.getElementsByTagName(b)[0];if (!a.getElementById(c)){a=a.createElement(b);a.id=c;a.src=&quot;//platform.twitter.com/widgets.js&quot;;d.parentNode.insertBefore(a, d)}})(document, &quot;script&quot;, &quot;twitter-wjs&quot;);
</script>
<style type='text/css'>
/*---- Horizontal Social Buttons Bar By MBT ---- */
#SocialShareBar {
float: left;
border-top: 1px solid #eaeaea;
border-bottom: 1px solid #eaeaea;
width: 610px;
margin-bottom: 20px;
margin-left: -10px;
margin-top: 10px;
position: relative;
clear:both;
z-index: 9999;
}
.social-heading h5 {
float: left;
padding-right: 20px;
padding-top: 13px;
text-transform: uppercase;
font-weight: bold;
margin: 0px;
padding-left: 10px;
font-family: &#39;Lora&#39;,Arial,Helvetica,Geneva,sans-serif;
font-size: 15px;
color: #555555;
}
.twitter-tweet, .facebook-like, .google-plus, .comment-counter {
float: left;
border-left: 1px solid #eaeaea;
padding-left: 18px;
padding-top: 15px;
padding-bottom: 10px;
width: auto;
height: 22px;
}
.comment-counter a {
text-decoration: none !important;
}
.share-bubble{
background: url(https://blogger.googleusercontent.com/img/b/R29vZ2xl/AVvXsEhOBLkcum_DP1nU5hLKmWSiJl0ZruHHyubTrs9VgqMPynMVC2KJjwEahNsv8O6dyt7QXK6r7wqCuqCwMsVFMIIJcR-idPtxQsugGzV_eoOa3RSiH1PcI2OgGDNoKX5rKapkazkcdfXUChoo/s1600/Comments.png) no-repeat;
height: 22px;
min-width: 30px;
float: left;
margin: 4px 5px 0px 5px;
}
.google-plus {
margin-left: 20px;
}
</style>
</b:if>

  • Now Search for Mentioned below Code.
<b:if cond='data:blog.metaDescription == &quot;&quot;'>
  • Now Paste the Mentioned below Code above the following Code.
<!-- Horizontal Social Sharing Buttons By MBT -->
<b:if cond='data:blog.pageType == &quot;item&quot;'>
<div id='SocialShareBar'>
<div class='social-heading'>
<h5>SOCIALIZE IT &#8594;</h5>
</div>
<div class='twitter-tweet'>
<a class='twitter-share-button' expr:data-text='data:post.title' expr:data-url='data:post.url' href='https://twitter.com/share'>Tweet</a>
</div>
<div class='facebook-like'>
<iframe allowTransparency='true' expr:src='&quot;http://www.facebook.com/plugins/like.php?href=&quot; + data:post.url + &quot;&amp;layout=button_count&amp;show_faces=false&amp;width=100&amp; action=like&amp;font=arial&amp;colorscheme=light&quot;' frameborder='0' scrolling='no' style='border:none; overflow:hidden; width:80px; height:21px;'/>
</div>
<div class='google-plus'>
<div class='g-plusone' data-size='medium' expr:data-href='data:post.url'/>
</div>
<div class='comment-counter'>
<div class='share-bubble'/>
<a class='comment-link' expr:href='data:post.addCommentUrl' expr:onclick='data:post.addCommentOnclick'>
<data:post.numComments/></a>
</div>
</div>
</b:if>
  • Now Press Save Template 
So Guys! I Hope you will like this widget, If you have any question feel free to ask me
KEEP READING